Pages

Wednesday, May 10, 2017

Convert uploaded file to array buffer


I would like to share some code snippet which will convert uploaded file to array buffer which we used mostly when upload something to SharePoint using JavaScript. Below is the code snippet for conversion,

var imageAsArrayBuffer;

//Get files from upload control 
var files = document.getElementById("picturefile").files;

fileData = new Blob([files[0]]);
var promise = new Promise(getBuffer);
promise.then(function(data) {       
     imageAsArrayBuffer = data;
}).catch(function(err) {
       alert('Error: ',err);
});

function getBuffer(resolve) {
var reader = new FileReader();
reader.readAsArrayBuffer(fileData);
reader.onload = function() {
 var arrayBuffer = reader.result
 //var bytes = new Uint8Array(arrayBuffer);
 resolve(arrayBuffer);
}

}

SharePoint Online - Update current user profile picture using JavaScript


I would like to share my recent experience to update current logged-in user profile picture programmatically using SharePoint OOTB REST API service SetMyProfilePicture as shown in below code example,

function setProfilePicture(imageAsArrayBuffer)
{
var output = false;
    var endpoint = _spPageContextInfo.webAbsoluteUrl + "/_api/SP.UserProfiles.PeopleManager/SetMyProfilePicture";    
    $.when($.ajax({
        url: endpoint,
type: "POST",
data: imageAsArrayBuffer,
processData: false,
headers: {
   "accept": "application/json;odata=verbose",
   "X-RequestDigest": $("#__REQUESTDIGEST").val(),
   "content-length": imageAsArrayBuffer.byteLength
},
success: function (data) {
alert("picture uploaded!");
},
error: function (data) {  
}
    })).done(function(data) {        
    });
    return output;
}

Need to convert the uploaded image to array buffer and provide it to data property of rest api service. Please search my blog to convert uploaded image to array buffer.

SharePoint Online - Update user profile properties using JavaScript


As SharePoint Online allows only JavaScript based code to do any updates, below example will show the way to update SharePoint Online user profile properties from site using SharePoint JavaScript object modal,

function startUpdate(){
          SP.SOD.executeFunc("sp.js", "SP.ClientContext", function(){
SP.SOD.registerSod("sp.userprofiles.js", SP.Utilities.Utility.getLayoutsPageUrl("sp.userprofiles.js"));
SP.SOD.executeFunc("sp.userprofiles.js", "SP.UserProfiles.PeopleManager", updateUserProfile);
});
}

var userProfileProperties;
function updateUserProfile(){
    //Get Current Context
    var clientContext = SP.ClientContext.get_current();
   
    //Get Instance of People Manager Class
    var peopleManager = new SP.UserProfiles.PeopleManager(clientContext);
   
    //Get properties of the current user
    userProfileProperties = peopleManager.getMyProperties();
   
    //Get only the accountname instead of all the properties.
    clientContext.load(userProfileProperties, "AccountName");
   
    //Execute the Query.
    clientContext.executeQueryAsync(function(){
    var currentUserAccountName = userProfileProperties.get_accountName();

    //Couple of properties for example
peopleManager.setSingleValueProfileProperty(currentUserAccountName, "CellPhone", mval);
peopleManager.setSingleValueProfileProperty(currentUserAccountName, "SPS-HireDate", hval);
//Birthday date format must be month name & date (October 19)
peopleManager.setSingleValueProfileProperty(currentUserAccountName, "SPS-Birthday", bval);
   
clientContext.executeQueryAsync(function(){
alert("Updated!");
},
function(sender,args){
alert(args.get_message());
});
   
    }, function(sender,args){
alert(args.get_message());
});
}

Powershell to sync exchange online to SharePoint Profiles


This articles talks about steps to update data from exchange online to SharePoint Online user profiles. Below script will do below steps part of sync,

1. Connect to Exchange Online by opening session.
2. Connect to SharePoint Online Admin Centre
3. Connect to SharePoint Online site collection. As SharePoint Online allows update to User Profiles through site collection.
4. Read through each profile from exchange online and will try to find the user available in SharePoint Online user profiles.
5. If user profile available, it will update.

Below script sample retrieving mobile number from exchange online and update to SharePoint Online user profiles,

Import-Module 'C:\Program Files\Common Files\Microsoft Shared\Web Server Extensions\16\ISAPI\Microsoft.SharePoint.Client.UserProfiles.dll'
Import-Module 'C:\Program Files\Common Files\Microsoft Shared\Web Server Extensions\16\ISAPI\Microsoft.SharePoint.Client.dll'

#Admin User Principal Name
$admin = <admin email address>

#Get Password as secure String
$password =  convertto-securestring <Password of above admin account> -asplaintext -force

#Authenticate
$credentials = new-object -typename System.Management.Automation.PSCredential -argumentlist $admin, $password

$Session = New-PSSession -ConfigurationName Microsoft.Exchange -ConnectionUri https://outlook.office365.com/powershell-liveid/ -Credential $credentials -Authentication Basic -AllowRedirection
Import-PSSession $Session
$Users = Get-User -ResultSize unlimited -RecipientType UserMailbox
$Users.Count

#Mysite URL
$site = 'https://<SharePoint Online Domain>-admin.sharepoint.com/' # This needs to be the "admin" site.
$Creds = New-Object Microsoft.SharePoint.Client.SharePointOnlineCredentials($admin,$password)
#Get the Client Context and Bind the Site Collection
$context = New-Object Microsoft.SharePoint.Client.ClientContext($site)
$context.Credentials = $Creds

#Create an Object [People Manager] to retrieve profile information
$people = New-Object Microsoft.SharePoint.Client.UserProfiles.PeopleManager($context)

$siteurl = 'https://<SharePoint Online Domain>.sharepoint.com/'
$sitecontext = New-Object Microsoft.SharePoint.Client.ClientContext($siteurl)
$sitecontext.Credentials = $Creds

ForEach($User in $Users)
{
    $userprofile = $people.GetPropertiesFor("i:0#.f|membership|" + $User.UserPrincipalName)
    $context.Load($userprofile)
    $context.ExecuteQuery()

    $mobileno = Get-User $User.UserPrincipalName | fl MobilePhone | Out-String
    if($mobileno.ToString().Trim().Length -gt 13)
    {
        $people.SetSingleValueProfileProperty("i:0#.f|membership|" + $User.UserPrincipalName,"CellPhone", $mobileno.ToString().Trim().Substring(14))
        $context.ExecuteQuery()        
    }        
}


SharePoint Online Current User Properties


As SharePoint Online will not allow any server side code, we have to depend on SharePoint JavaScript Client Side Object Modal. We may not have all the features we get at server side but now a days Microsoft enhancing the SharePoint Client object modal a lot to support most the things while work lists, libraries, items, documents and user profiles.

There is one global object available while working with JavaScript in SharePoint Online and that is _spPageContextInfo. You can access all current logged in user related properties as mentioned below,

Display Name - _spPageContextInfo.userDisplayName
User Id - _spPageContextInfo.userId
Email - _spPageContextInfo.userEmail
Login Name - _spPageContextInfo.userLoginName
Is site admin - _spPageContextInfo.isSiteAdmin

Also current site details,

Current site collection URL - _spPageContextInfo.siteAbsoluteUrl
Current Site collection relative URL - _spPageContextInfo.siteServerRelativeUrl
Current web site relative URL - _spPageContextInfo.webServerRelativeUrl
Current web site URL - _spPageContextInfo.webAbsoluteUrl
Current Site Culture name - _spPageContextInfo.currentCultureName
Current Site Language LCID - _spPageContextInfo.currentLanguage

SharePoint Online Search Content Crawling


From my experience about search crawling/indexing of SharePoint Online content after add/update/delete content in to lists/libraries. Usually SharePoint Online takes up to 15 min. time to crawl the content to make it available in search results. This time may increase based on content size of the site which will take to process them part of continuous crawling. Office 365 & SharePoint Online not provided any explicit option to start the crawl by end users and that will be maintained by Microsoft.

Also couple of things related to search in SharePoint Online below for developers who do not have idea,

1. We can use custom site columns data part of search result. SharePoint Online creates crawled properties of site columns by default and only we need to map them with managed properties. Go to site settings --> Site Collection Administration --> Search Schema, click on crawled properties and search with your site column, that will be appeared in the results and you can map that with managed property. After couple of hours, the managed property become available to use in search display templates.


2. Refiner/Sort - To refine/filter or sort search results based on particular site column, cannot do with our own managed properties. There are predefined managed properties available and those are started with Refinable (with different data types). These managed properties will be available to filter/sort when we use content search web part and search results web part. Only we need to map crawled properties to it.


Tuesday, May 9, 2017

Create a publishing page using custom page layout programmatically


Recently, I have got requirement to create a publishing page programmatically using JavaScript in SharePoint Online. Below are the steps details and example code snippet,

function createPage(){
$.getScript(_spPageContextInfo.webServerRelativeUrl + "/_layouts/15/" + "SP.Publishing.js", function(){
SP.UI.ModalDialog.showWaitScreenWithNoClose("Creating Page", "Please wait");    
   clientContext = new SP.ClientContext.get_current();  
   oSite = clientContext.get_site();
   oWeb = oSite.get_rootWeb();  

            //Get the client context,web and list object of Master Page Gallery
   var oList = oWeb.get_lists().getByTitle('Master Page Gallery');  

   //Get the page layout by ID using which we will create a publishing page       
   pageLayoutitem = oList.getItemById(pagelayoutid); 

   clientContext.load(oWeb); 
   clientContext.load(pageLayoutitem);  
   clientContext.executeQueryAsync(QuerySuccess, QueryFailure);
    });
}
function QuerySuccess() {  
    //Create Publishing Page using PublishingPageInformation object   
    var curContext = new SP.ClientContext.get_current(); 
    var cWeb = curContext.get_web();
    var newPublishingPage = SP.Publishing.PublishingWeb.getPublishingWeb(curContext, cWeb);  
    var pageInfo = new SP.Publishing.PublishingPageInformation();  
    pageInfo.set_name("sample.aspx");  
   
    pageInfo.set_pageLayoutListItem(pageLayoutitem);  
    newPage = newPublishingPage.addPublishingPage(pageInfo);  
    //Load the new page object to the client context   
    clientContext.load(newPage);  
    clientContext.executeQueryAsync(SecondQuerySuccess, SecondQueryFailure);  
}  

function QueryFailure(sender, args) {  
    console.log('Request failed' + args.get_message());
    SP.UI.ModalDialog.commonModalDialogClose(SP.UI.DialogResult.Cancel);
    alert("Something went wrong, refresh and try again");  
}  

function SecondQuerySuccess(sender, args) {  
    console.log("Publishing page created successfully.");
    var pageItem = newPage.get_listItem();
        pageItem.get_file().checkIn("", 0);
        clientContext.load(pageItem);
        clientContext.executeQueryAsync(function () {
            //Open publishing page which is created     
    window.open(pageItem.get_item('FileRef'), '_blank');
   }, SecondQueryFailure);
        }, Function.createDelegate(this, SecondQueryFailure));       
}  
function SecondQueryFailure(sender, args) {  
    SP.UI.ModalDialog.commonModalDialogClose(SP.UI.DialogResult.Cancel);
     alert("Something went wrong, refresh and try again");
}

Make sure SP.Publishing.js file loaded before execute above script.

Monday, May 8, 2017

Get SharePoint ribbon actions outside using pagestatecommands


SharePoint facilitating a framework to re-use the ribbon actions outside in a page layout. Like to edit, save, publish, discard changes. Find the below example code snippet below to use the page state commands,

var mgr = SP.Ribbon.PageManager.get_instance();
if(mgr && (mgr.get_commandDispatcher()).isCommandEnabled('PageStateGroupSaveAndStop')) {
(mgr.get_commandDispatcher()).executeCommand('PageStateGroupSaveAndStop', null);
sessionStorage.setItem('SAVE','saved');
}
return CancelEvent(event);


Above code is to save the page without using ribbon action and outside of it. You can include above code in button click and which will execute based on context of the page. While using page state commands, make sure "Show and Hide Ribbon" option selected to "No" in Navigation of site. Also make sure SP.Ribbon.js file loaded before execute the commands code.

Please refer list of page state commands available with clear explanation in msdn article: https://msdn.microsoft.com/en-us/library/office/ee551465(v=office.14).aspx


SharePoint JavaScript Get Form Digest Dynamically


While working with SharePoint REST API services, sometimes POST call is having issues with using form digest (code: $("#__REQUESTDIGEST").val()). In these cases, need to generate the form digest based on context and below code is for it,

return getFormDigest().then(function (digestval) {
      return $.ajax({
        url: _spPageContextInfo.webAbsoluteUrl + "/_api/contextinfo",
        method: "POST",
        headers: { "Accept": "application/json; odata=verbose" }
    });
});

SharePoint REST API getting all list items


SharePoint Online allow us to read list items with help of JavaScript Client side Object modal. There are two REST API services available to read the items as explained below,

I. REST API: /_api/web/lists/GetByTitle('ListName')/items
Below is the code snippet to read list items,

function getListItems(){
var output = [];
    var endpoint = _spPageContextInfo.siteAbsoluteUrl + "/_api/web/lists/GetByTitle('Configurations')/items";   
    $.when($.ajax({
        url: endpoint,
 method: "GET",
 async:false,
 headers: { 
  "X-RequestDigest": $("#__REQUESTDIGEST").val(),
       "Accept": "application/json; odata=verbose",
       "Content-Type": "application/json; odata=verbose"
  },
 success: function (data) {      
 
 },
 error: function (data) {
 }
    })).done(function(data) {        
    });
    return output;

}

Above method only returns top 100 items and cannot read all items of list more than 100. To get all list items without limit use 2nd approach below.

II. REST API: /_api/web/lists/GetByTitle('ListName')/GetItems
Below is the code snippet to read list items,

function getListItems()
{
var output = [];
var pageslib = getPagesLib();
    var endpoint = _spPageContextInfo.webAbsoluteUrl + "/_api/web/lists/GetByTitle('Configurations')/GetItems";
    var requestData = { "query" :
           {"__metadata": 
              { "type": "SP.CamlQuery" }
              , "ViewXml": "
"           }
        };
    $.when($.ajax({
        url: endpoint,
 method: "POST",
 async:false,
 data: JSON.stringify(requestData),
 headers: { 
  "X-RequestDigest": digval,
           "Accept": "application/json; odata=verbose",
           "Content-Type": "application/json; odata=verbose"
  },
 success: function (data) {  
 },
 error: function (data) {
  debugger;
 }
    })).done(function(data) {        
    });
    return output;

}
Above function returns all list items without any limit. You can modify 'ViewXml' attribute to apply CAML Query to filter/sort the items. digval is the form digest value need to generate based on current site context. Please search my blog for code to get form digest value dynamically.

Thursday, September 1, 2016

Sort Object Array by Value - JQuery


Below code snippet will be useful in sorting the array of objects by its one of property. In below example, label is the property.

function sortyArrayByProperty(a, b){
  var aName = a.label.toLowerCase();
  var bName = b.label.toLowerCase(); 
  return ((aName < bName) ? -1 : ((aName > bName) ? 1 : 0));
}

yourobjectsarray.sort(sortyArrayByProperty);

Monday, November 2, 2015

Open this Web Part Page in maintenance view to delete problem Web Parts and remove personal settings - SharePoint library aspx page upload


As shown in below image, when upload aspx page in SharePoint library and editing its properties, the error message 'Open this Web Part Page in maintenance view to delete problem Web Parts and remove personal settings'  will be shown at the bottom of the edit properties window. This is actually by design SharePoint shows the error message when we upload aspx page in any SharePoint library.


Thursday, October 15, 2015

Associate work item to changeset after check in - Visual Studio 2012/2013


Usually we forget to associate work item before check-in files or the work item associating fail while check-in. Below are the steps to associate work item to changes set after check-in the files.

1. Keep change set id and go to Work Item, the one need to associate to change set.
2. Click on 'Link to' as shown in below image,


3. Select 'Link Type' to Changeset and enter changeset number as shown in below image. Click Ok after enter required information.


4. result will be as shown in below image. Save work item to complete the action.


Monday, September 28, 2015

Get SharePoint Site Users and User Profiles using JSOM


Using SharePoint JavaScript Client Side Object Model framework, we can get all site users information and each user profile properites (ex. Birthday, Work Email, Phone...etc).

1. To get site users information, use SP.Web.siteUsers property
2. then use SP.UserProfiles.PeopleManager.getUserProfilePropertyFor Method to get user profile properties.

Example code:

//Usage
var scriptbase = _spPageContextInfo.webAbsoluteUrl + '/_layouts/15/';
$.getScript(scriptbase + 'SP.js', function () {
  $.getScript(scriptbase + 'SP.UserProfiles.js', function () {
    getUsersBirthdays(function(usersProperties){
       for(var i = 0; i < usersProperties.length;i++)
       {
           console.log(usersProperties[i].get_value());
       }
    },
    function(sender,args){
       console.log(args.get_message());
    });
  });
});

//Get Birthday User Profile Property for Site Users
function getUsersBirthdays(Success,Error) {
    var clientContext = new SP.ClientContext.get_current();
    var web = clientContext.get_web();

    var users = web.get_siteUsers();
    clientContext.load(users);
    clientContext.executeQueryAsync(
    function() {
       var peopleManager = new SP.UserProfiles.PeopleManager(clientContext);
       var personsProperties = [];
       for(var i = 0; i < users.get_count();i++)
       {
           var user = users.getItemAtIndex(i);
           var personBirthday = peopleManager.getUserProfilePropertyFor(user.get_loginName(),'SPS-Birthday');
           personsProperties.push(personBirthday);
       }

       clientContext.executeQueryAsync(
           function() {
             Success(personsProperties);
           },
           Error);

    },
    Error);
}


Create SharePoint Site Collection with site template


The great feature in SharePoint site that you can take the complete site with content as template and can re-use it else where to create a site based out of it. Basically, will upload site templates and create sub sites based on custom site template.

In this article, will show how to create a whole Site Collection based on site template. Create the site template as you normally would be going into Site Settings for that site and then selecting Save site as a template.


Site template will be saved in 'Solutions' gallery of SharePoint site collection. Go and download it your local and keep it to upload later.

Here's the steps,
Go to SharePoint Online administration and click on 'Private Site Collection' and will get below window to provide new site collection details,


Along with all other details, in 'Template Selection' section select preferred language and select 'Custom' tab as shown in above image. Select option '

After site collection created, open new site collection URL. Since the site doesn’t have a template yet you will be prompted to choose one. At the top you’ll see the standard SharePoint templates but below this you’ll see option to upload something to the Solution Gallery of the new site collection. You should select this.


You should see that the Solution Gallery is empty. You now need to upload the template you downloaded from the previous site that was saved on your workstation. To do this simply select the Upload Solution button in the top left and proceed to upload the template from your workstation.


Just before you close the dialog displayed after uploading the file completes you should select the Activate button on the right of the Ribbon Menu to make that template available. Failing to do this will mean that it can’t used.


You should now see a single activated solution in the gallery as shown above.


You’ll need to browse to the URL of your new site collection again but now if you select the Custom tab in the Template Selection area you should see the name of your custom site template as shown above. Select this and press the OK button to proceed with the creation process.

The time it takes to create the new root site in the new site collection depends on how large your custom template is but in a short period of time the new site collection based on your custom template will be created. All you need to do is set the security groups and you are good to go.

That’s how you create a completely new site collection from an existing site template.

SharePoint Designer Online Server Error:'Access Denied' on modify anything


Most probably get 'Access Denied' when Custom Script feature is turned off. This will not allow to check-out/check-in or do save operation on anything in SharePoint site. Please follow the below steps to enable the Custom Script feature and that will solve the issue.

1. Sign in to Office 365 with your work or school account.
2. Go to the SharePoint admin center.
3. Select Settings.
4. Under Custom Script choose:

- Prevent users from running custom script on personal sites or Allow users to run custom script on personal sites.
- Prevent users from running custom script on user created sites or Allow users to run custom script on self-service created sites.


5. Select OK. It takes about 24 hours for the change to take effect 
Also, we can enable the feature using powershell script and that will take effect immediately. Execute below scripts in SharePoint Online Management Shell. 

Connect-SPOService -Url https://testspsite-admin.sharepoint.com -credential spadmin@testspsite.onmicrosoft.com

Set-SPOSite -Identity "https://testspsite.sharepoint.com" -DenyAddAndCustomizePages $false

After run above two powershell scripts, you can start modify files immediately. 

Hope this helps.

Thursday, August 28, 2014

Facebook comments plugin for SharePoint publishing pages


We can plugin facebook comments to public facing SharePoint pages which will be created dynamically. Get code from facebook comments plugin and include below script.


with below script, the current page url will be captured and update data-href value to make facebook comments specific to the current page.


SharePoint Hosted App - This page can't be displayed


When we deploy directly from visual studio, app will work fine. Because when deploy from visual studio, It will add host entry for an app. If upload the .app package file to SharePoint site manually, may get below issue on click of an app,


Example of host entry by visual studio on deploy,

127.0.0.1             app-e9cbfac49ea738.spdevapps.com     # 4beb64a4-83fc-474b-b6c6-d43df3f33fdf;http://sp2013/
::1                        app-e9cbfac49ea738.spdevapps.com     # 4beb64a4-83fc-474b-b6c6-d43df3f33fdf;http://sp2013/

In above example,
app-e9cbfac49ea738.spdevapps.com – App URL
4beb64a4-83fc-474b-b6c6-d43df3f33fdf – Product ID of an app, you can find this AppManifest.xml
http://sp2013/ - Host site URL where installing an app based on uploaded app package.

If get above issue (The page can't be displayed), we need to add host entry for the app manually. Use below powershell command to get app url because, app url will be changed everytime with app id.,

                            $instances = Get-SPAppInstance -Web


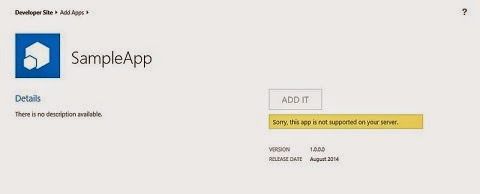
SharePoint 2013 Hosted App – Sorry, this app is not supported on your server


This issue comes when we upload .app (Published from Visual Studio) SharePoint hosted app package which has XAML workflows. Please find the below steps to get rid of the below issue,


1.       Take .app file and change extension to .zipp
Ex. MySampleApp.app – is the app package. Change to MySampleApp.zip

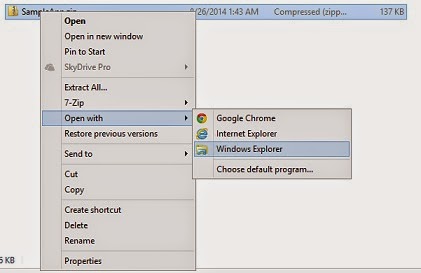
2.       Right click on .zip file and Open with à Windows explorer (do not unzip it).


3.       Take the copy of AppManifest.xml file and past outside on drive.


4.       Open copied AppManifest.xml in notepad and remove below tags.


5.       Save the AppManifest.xml file and copy AppManifest.xml file back to same location in 3rd point. It will ask for replace the file and click on replace the file option. This will replace the AppManifest.xml file in MySampleApp.zip package.

6.       Rename MySampleApp.zip to MySampleApp.app

7.       Upload MySampleApp.app file to SharePoint App Catalog site or directly can upload to developer site.

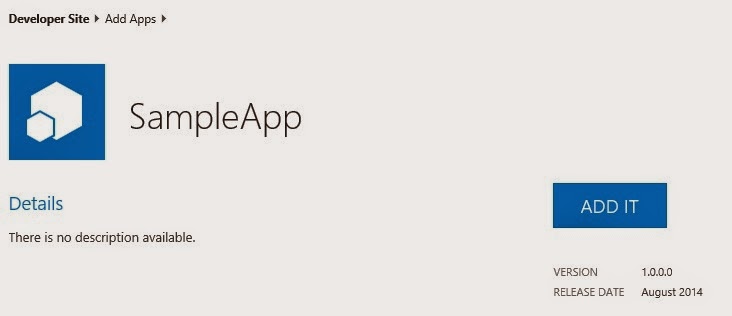
8.       Now MySampleApp app is available to install in to developer site,


9.       Click on 'ADD IT' button to install.

Sorry, something went wrong with adding the app. click to retry


Sometimes when try to install SharePoint app in developer site, will get 'Sorry, something went wrong with adding the app. click to retry' as shown in below image.


The app cannot be removed/uninstalled from UI using 'Remove' option in this case. Follow below PowerShell commands to remove the app from developer site.

$developerSiteUrl = Get-SPAppInstance -Web
$appInstance = $developerSiteUrl | where {$_.Title -eq ''}
Uninstall-SPAppInstance -Identity $appInstance